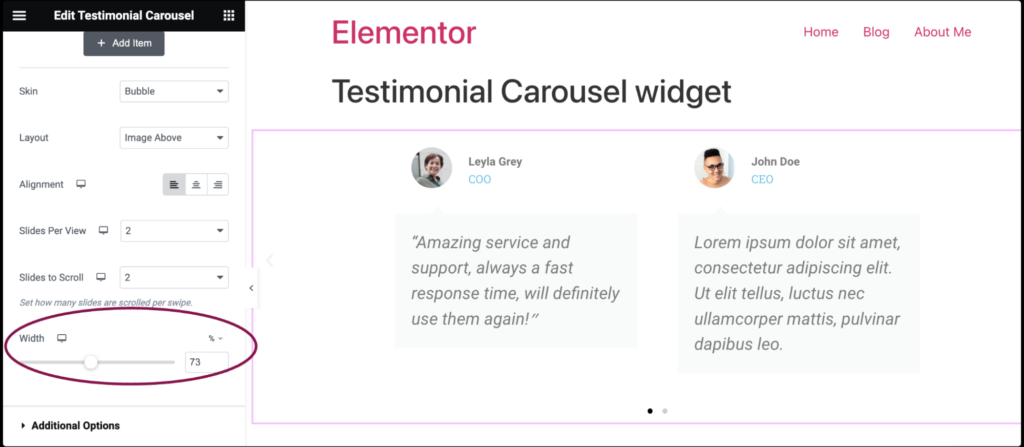
Showcasing client testimonials on your website can enhance trust and credibility. Using Elementor’s Testimonial Carousel and ACF (Advanced Custom Fields), you can create a dynamic, visually appealing way to display testimonials. This guide is perfect for beginners looking to create an automated and customizable solution.

What is ACF and Why Use It with Elementor?
Advanced Custom Fields (ACF) is a WordPress plugin that allows you to add custom data fields to your posts, pages, or custom post types. Combining ACF with Elementor enables:
- Dynamic content: Automatically display testimonials without manual updates.
- Custom layouts: Tailor the design to match your website’s branding.
- Scalability: Easily manage a growing database of testimonials.
Steps to Create an Elementor Testimonial Carousel with ACF
Step 1: Install Required Plugins
- Install and activate the following plugins:
- Elementohttps://elementor.com/pro/r Pro (for the Testimonial Carousel widget and dynamic content features).
- Advanced Custom Fields (ACF).
- Optionally, Custom Post Type UI for creating a dedicated testimonial post type.
Step 2: Create a Custom Post Type for Testimonials
- Go to CPT UI > Add/Edit Post Types and create a new post type named “Testimonials.”
- Configure labels, permalink settings, and other options for your testimonial post type.
Step 3: Add Custom Fields with ACF
- Navigate to ACF > Field Groups and create a new field group for testimonials.
- Add fields such as:
- Client Name (Text)
- Testimonial Text (Textarea)
- Client Image (Image)
- Rating (Select or Number)
- Assign the field group to the “Testimonials” post type.
Step 4: Add Testimonial Entries
- Go to Testimonials > Add New and enter testimonial details using the custom fields created in ACF.
- Repeat for each testimonial you want to display.
Step 5: Design the Testimonial Carousel in Elementor
- Open the page where you want to add the carousel in Elementor.
- Drag the Testimonial Carousel widget onto the page.
Step 6: Connect ACF Data to the Carousel
- In the Testimonial Carousel widget, switch the content source to Dynamic.
- Use dynamic tags to link the ACF fields to the carousel items:
- Client Name: Link to the corresponding ACF field.
- Client Image: Set as a dynamic image source.
- Testimonial Text: Map to the ACF testimonial text field.
Step 7: Style the Carousel
- Customize fonts, colors, and layout in the Elementor editor.
- Test responsiveness for mobile, tablet, and desktop views.
Tips for Optimizing Your Testimonial Carousel
1. Use High-Quality Images
Ensure client images are clear and properly cropped. Compress them with tools like TinyPNG to optimize load times.
2. Add Schema Markup
Use schema markup to improve the visibility of testimonials in search engine results. Plugins like Rank Math make this simple.
3. Keep It Updated
Regularly add new testimonials to keep your carousel fresh and relevant.
Common Troubleshooting Tips
- Dynamic Data Not Showing: Check that ACF fields are properly assigned to the testimonial post type.
- Carousel Not Loading: Ensure Elementor Pro is active and your plugins are up to date.
- Styling Issues: Use Elementor’s advanced styling options or custom CSS for fine-tuning.
FAQs
1. Do I need Elementor Pro for this setup?
Yes, Elementor Pro is required to access the Testimonial Carousel widget and dynamic content features.
2. Can I filter testimonials by category?
Yes, you can use Elementor’s Query Builder to filter testimonials by taxonomy or custom field values.
3. How do I add a “View All Testimonials” link?
Create a dedicated testimonials archive page and link to it from the carousel section.
Conclusion
Building a dynamic testimonial carousel in Elementor using ACF is a powerful way to display client feedback. This approach ensures flexibility, automation, and scalability for your website. By following the steps in this guide, you’ll have a professional-looking carousel in no time.
For more advanced customization, explore additional Elementor and ACF features to take your designs to the next level!


